

How to Configure Canvas
Introduction
This document describes how to configure Canvas with CurrikiStudio.
There are three separate integrations available
- Deeplink a Curriki Activity to an assignment or activity in Canvas. This provides Grade passback and review of student work
- Single Sign-on from Canvas to Curriki Studio
- Publish a Curriki Studio Project to a new or existing Canvas Course with the same name as the Project
1. Deeplinking to Curriki Activity
This section created the keys to integration Curriki Studio with your Canvas instance. Deeplink allows for grade passback and provides teachers the ability to review student work.
- Create Developer LTI Key on Canvas under “Admin > Developer Keys” by the Config URL.
- Got To Admin > Developer keys and select “Add Developer Key” and “LTI Key”

- Enter “Curriki Studio” in Key Name
- Select Method “Enter URL” and paste the provided URL in URL (JSON) format is
https://studio-tsugi.curriki.org/lti/store/canvas-config.json?issuer_guid=YOUR_GUID
- Enter Redirect URIs: as https://studio-tsugi.curriki.org/lti/oidc_launch
- Click “save”

- Add Placements to the Developer Key
- Edit the existing developer key by clicking the pencil.

- Change the method to “manual entry”

- Scroll down and expand Additional Settings and add the following custom parameters
- login_id=$Canvas.user.loginId
course_id=$Canvas.course.id
course_code=$com.instructure.contextLabel
course_name=$Canvas.course.name
api_domain_url=$Canvas.api.domain
person.name.given=$Person.name.given
person.name.family=$Person.name.family
person_email_primary=$Person.email.primary
- login_id=$Canvas.user.loginId

- Scroll down to “Placements” and add “Link Selection” and “Assignment Selection”.

- Expand both Link Selection and Assignment selection and enter the following settings and click “Save”
- Message Type = LtiDeepLinkingRequest
- Target Link URI = https://studio-tsugi.curriki.org/mod/curriki/content
- Icon Url = https://studio.curriki.org/favicon-apple.png
- Text = CurrikiGo

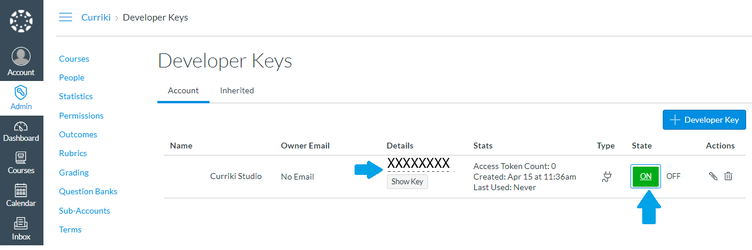
- “enable” the developer key and make note of the Client ID from the developer key we just created from the listing screen. It is the numeric value under details
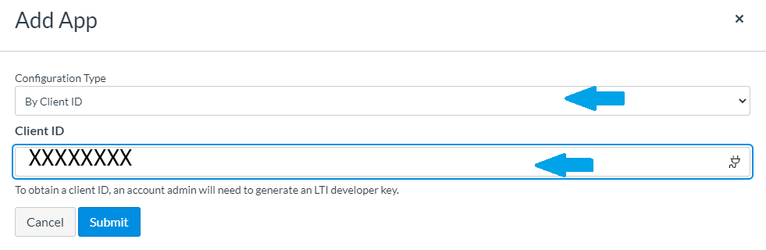
- Create App using the Client ID
- Go to Admin > Settings> App > “+ App”
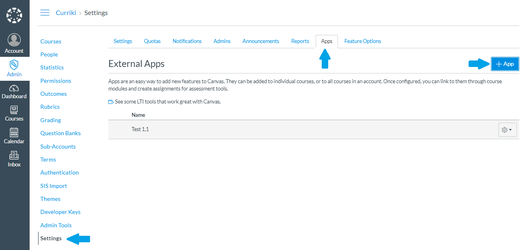
- Select “Configuration Type “ of “By Client ID”, Paste Client ID from the previous step and click “Submit”
- Click Install <App Name>

Got to the configuration wheel and make note of the deployment ID


- Please send the Access token, Client ID, and Deployment ID to LMS-Setup@curriki.org
- To provide additional CurrikiStudio Users access, please send your CurrikiStudio admin the CurrikiStudio UserID or Name along with their associated LMS user ID.
2. Provide Single Sign-on from Canvas to Curriki Studio (optional)
You can configure Canvas so that teachers can go directly to Curriki Studio to create content from within Canvas. This integration will also automatically create an account for the teacher if one does not exist.
- Add additional Placements to the Developer Key
- Edit the developer key you previously created for Curriki Studio by clicking the pencil.
- Change the method to “manual”
- Scroll Down to placements and add Course Navigation

3. Expand Course Selection and enter the following settings and click “Save”
Target Link URI = https://studio-tsugi.curriki.org/mod/curriki/content?placement=canvas_sso
Icon Url = https://studio.curriki.org/favicon-apple.png
Text = CurrikiStudio
d. Change Method back to “Paste JSON”.
Please note: The JSON editor in Canvas has issues making it difficult to edit. We recommend that you copy the JSON into another text editor or validator like https://jsonformatter.curiousconcept.com/# and then paste the entire JSON back into the dev key. IN addition, when you place the JSON back into the editor the redirect URL will be overwritten. You will need to put the original redirect url back in the developer key.
e. add the following three lines to the bottom of the course_navigation placement. This is important as it ensures that only teachers have access to Curriki Studio, Curriki Studio launches in its own window, and that it is disabled by default. Teachers can enable this by going to settings > Navigation in the course.
“windowTarget”: “_blank”,
“visibility”: “admins”,
“default”: “disabled”
f. Save the Developer Key. You will need to go back in one more time and update the redirect URL. Change this to https://tst-tsugi.curriki.org/lti/oidc_launch
3. Publishing from Curriki Studio (optional)
This allows users to publish a project as a course in Canvas. It does n to allow for grade pass back or the ability to review student work.
- Create an “Access Token” under (Admin) Account > Settings

- Goto Account > Settings, click “+New Access Token”, enter a name. (Leave expiration date blank), and click “Generate Token”

- Make note of Access token. You will need to send this back to the Curriki Integration specialist

